Document Reader for the Visually Impaired
My Raspberry Pi Document Reader allows those visually impaired, or those who just want don’t want to read, to have a document read outloud for them! My biggest challenge was getting my Raspberry Pi Computer set up without a monitor and figuring out which questions to ask. I learned how to use a Raspberry Pi computer, brushed up on my circuit building skills, and practiced refactoring code!
| Engineer | School | Area of Interest | Grade |
|---|---|---|---|
| Ella S | Forest Ridge School | Computer Science | Incoming Senior |
 |
 |
Final Milestone
My third milestone was recreating my LED and button circuits using alligator clips and refiguring the command line commands in the document reader code into PiCamera2 function calls. Initially, I used a breadboard, inside my cardboard box, to connect my LED and button to the raspberry pi. So, every time I ran my document reader, I had to open the box to press the button. Instead, I wanted my button and LED to poke out through the top of my cardboard box, so that users would be able to easily press the button and see the LED flash on and off. When connected to the breadboard, my button was way shorter than my LED light. If I had my breadboard right under the cardboard box, I would not be able to have the LED and button poking out at the same height, and the resistor and wires would also have to stick out. So, I wanted to figure out a way to get my LED and button off the breadboard. My instructor recommended I solder the wires together, but I didn’t have an outdoor space to work and didn’t want to breathe in the fumes inside. So, I ultimately decided to use alligator clips to put the circuit together. First, I made some cuts in a piece of cardboard, in which I stuck the button and LED at different heights – with the button sitting on top and the LED hanging slightly below. Then, I cut a hole out of my cardboard box and placed my piece of cardboard above it. Within my box, I clipped one of the ends of the alligator clips to the dupont wires that connected to the Raspberry Pi and the other ends to the wires of the LED and button. Although the wires and alligator clips look slightly messy inside the box, they worked! The second part of my first milestone was making my document reader more discreet and functional by allowing the stand to fold down, adding hinges to the cardboard box, and creating a cardboard extender so my document reader can hold longer documents. I followed a Youtube tutorial on how to create hinges out of cardboard and paper, which worked pretty well! I then hot-glued them onto my box. Using my prior knowledge and the cardboard hinge tutorial, I devised a solution that would allow my camera stand to be foldable but also hold up and stand straight once unfolded. This is what I came up with: To create the cardboard extender, I cut out a strip on the side of my box and inserted a piece of cardboard almost as wide as the box. For the extender to not run into my wires, I cut out the inside, leaving the extender as a frame.
Second Milestone
My second milestone was setting up hardware and importing the document-reader code. In the tutorial, the base of the document reader is an 8x8 wooden box, which holds the Raspberry Pi and speaker and acts as a surface for the documents to lie on. I used cardboard instead, as I had a bunch of boxes at home. I cut two squares out of cardboard out of a box and bent down the edges to create a new, smaller, 8x8 box. Then, I added a hole to the bottom half for my Raspberry Pi’s power cable to go into. I added holes to the top of the cardboard box that looked like a speaker grill, placed the speaker below the holes, and connected the speaker to my Raspberry Pi. I also cut a strip in my cardboard box for my camera cable to go through, allowing my camera to be outside the box while the raspberry pi is inside the box. Using the command “git clone https://github.com/rgrokett/PiTextReader.git” on puTTY, I cloned the PiTextReader code folder from the instructions into my RaspberryPi. The code takes a picture of an item, converts it to plain text using Tesseract OCR (Optical Character Recognition), an external engine, and then speaks the text using text-to-speech. When I ran the code, I heard the expected “Ok ready” and “Ok working,” but did not hear any text read aloud. After testing the camera by taking a few stills, I realized that my text was too small for the camera to pick up. I tried adjusting the camera height and some of the libcamera properties, including sharpness and picture dimensions, but no small words remained illegible. So, I decided to instead use a document with larger, bolder text–it worked!
First Milestone
For my first milestone, I got my raspberry pi set up and working. I did not have a monitor to use to set up my raspberry pi, so my instructors recommended I set it up headless, meaning I set up the raspberry pi without any monitor, keyboard, or mouse. To set it up headless, I first had to install the Raspberry Pi OS (32-bit) into my Raspberry Pi’s SN Card. I had to enable SSH, Secure Shell, a service that runs on Pi that allows for secure remote connection. I then inserted the SN Card into my Raspberry Pi, connected the Pi to power and my Pi was up and running! To connect my laptop to the Pi, I used PuTTY, a free software used for remote command-line access to Linux, which Raspberry Pi OS is. Going forward, every time I want to connect to my Raspberry Pi, I must SSH in through PuTTY. A challenge I faced was that my VS Code would repeatedly freeze. So, I chose to code my Raspberry Pi through a VNC Viewer, which would allow me to see the desktop of the Raspberry Pi on my laptop and then code directly on my Raspberry Pi. VNC stands for virtual network connection. I downloaded the RealVNCViewer and connected it to my Raspberry Pi on my local network. At this point, I could see two programming apps on the Raspberry Pi’s desktop, which were Geany Programmer’s Editor and Thonny. I opened Thonny and ran the Python command, print(“Hello World”) as a test, and it successfully printed to the terminal. For the last step of my first milestone, I took a test picture with the Raspberry Pi camera module. To do so, I first connected the camera to the Raspberry Pi’s camera port. Then, I ran the command on PuTTY “libcamera-still -o test.jpg”, which means I am taking a still photo and saving it on my Raspberry Pi as test.jpg. My instructor provided the picamera2 library, which I cloned onto my Raspberry Pi. I ran a couple of its files through the VNC, some that took videos and some that took different types of photos, to learn how picamera2 worked! To complete my project, I will need to connect all the hardware and get the code into my Raspberry Pi.
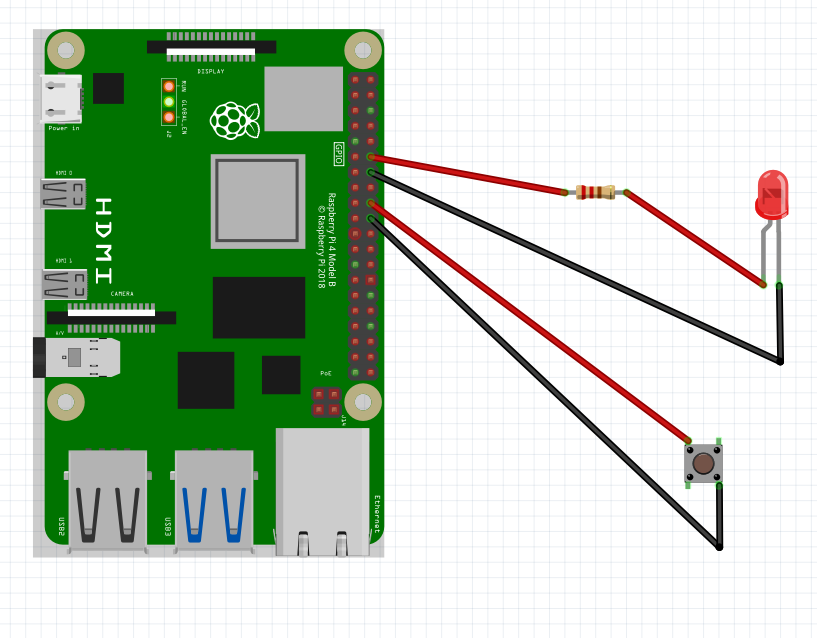
Schematic
Code
# PiTextReader - Raspberry Pi Printed Text-to-Speech Reader

# Allows sight impaired person to have printed text read using
# OCR and text-to-speech.

# Normally run by pi crontab at bootup
# Turn off by commenting out @reboot... using $ crontab -e; sudo reboot
# Manually run using $ python pitextreader.py

# This is a simplistic (i.e. not pretty) python program
# Just runs cmd-line pgms raspistill, tesseract-ocr, flite to do all the work

# Version 1.0 2018.02.10 - initial release - rgrokett
# v1.1 - added some text cleanup to improve reading
# v1.2 - removed tabs

# http://kd.grokett.com/

# License: GPLv3, see: www.gnu.org/licenses/gpl-3.0.html


import RPi.GPIO as GPIO
import os, sys
import logging
import subprocess
import threading
import time
from picamera2 import Picamera2, Preview
import libcamera

picam2 = Picamera2()

##### USER VARIABLES
DEBUG   = 0 # Debug 0/1 off/on (writes to debug.log)
SPEED   = 1.0   # Speech speed, 0.5 - 2.0
VOLUME  = 90    # Audio volume


# GPIO BUTTONS
BTN1    = 24    # The button!
LED     = 18    # The button's LED!


### FUNCTIONS
# Thread controls for background processing
class RaspberryThread(threading.Thread):
    def __init__(self, function):
        self.running = False
        self.function = function
        super(RaspberryThread, self).__init__()

    def start(self):
        self.running = True
        super(RaspberryThread, self).start()

    def run(self):
        while self.running:
            self.function()

    def stop(self):
        self.running = False

# LED ON/OFF
def led(val):
    logger.info('led('+str(val)+')')
    if val:
       GPIO.output(LED,GPIO.HIGH)
    else:
       GPIO.output(LED,GPIO.LOW)

# PLAY SOUND
def sound(val): # Play a sound
    logger.info('sound()')
    time.sleep(0.2)
    cmd = "/usr/bin/aplay -q "+str(val)
    logger.info(cmd)
    os.system(cmd)
    return

# SPEAK STATUS
def speak(val): # TTS Speak
    logger.info('speak()')
    cmd = "/usr/bin/flite -voice awb --setf duration_stretch="+str(SPEED)+" -t \""+str(val)+"\""
    logger.info(cmd)
    os.system(cmd)
    return

# SET VOLUME
def volume(val): # Set Volume for Launch
    logger.info('volume('+str(val)+')')
    vol = int(val)
    cmd = "sudo amixer -q sset PCM,0 "+str(vol)+"%"
    logger.info(cmd)
    os.system(cmd)
    return

# TEXT CLEANUP
def cleanText():
    logger.info('cleanText()')
    cmd = "sed -e 's/\([0-9]\)/& /g' -e 's/[[:punct:]]/ /g' -e 'G' -i /tmp/text.txt"
    logger.info(cmd)
    os.system(cmd)
    return

# Play TTS (Allow Interrupt)
def playTTS():
    logger.info('playTTS()')
    global current_tts
    current_tts=subprocess.Popen(['/usr/bin/flite','-voice','awb','-f', '/tmp/text.txt'],
        stdin=subprocess.PIPE,stdout=subprocess.PIPE,
        stderr=subprocess.PIPE,close_fds=True)
    # Kick off stop audio thread
    rt.start()
    # Wait until finished speaking (unless interrupted)
    current_tts.communicate()
    return


# Stop TTS (with Interrupt)
def stopTTS():
    global current_tts
    # If button pressed, then stop audio
    if GPIO.input(BTN1) == GPIO.LOW:
        logger.info('stopTTS()')
        #current_tts.terminate()
        current_tts.kill()
        time.sleep(0.5)
    return

# GRAB IMAGE AND CONVERT
def getData():
    logger.info('getData()')
    led(0) # Turn off Button LED

    # Take photo
    picam2.start_preview(Preview.QTGL)
    preview_config = picam2.create_preview_configuration()
    preview_config["transform"] = libcamera.Transform(hflip = 1, vflip=1)
    picam2.configure(preview_config)
    picam2.start()
    picam2.capture_file("/tmp/image.jpg")
    print("Picture taken")

    # OCR to text
    speak("now working. please wait.")
    cmd = "/usr/bin/tesseract /tmp/image.jpg /tmp/text"
    logger.info(cmd)
    os.system(cmd)

    # Cleanup text
    cleanText()

    # Start reading text
    playTTS()
    return

######
# MAIN
######
try:
    global rt
    # Setup Logging
    logger = logging.getLogger()
    handler = logging.FileHandler('debug.log')
    if DEBUG:
        logger.setLevel(logging.INFO)
        handler.setLevel(logging.INFO)
    else:
        logger.setLevel(logging.ERROR)
        handler.setLevel(logging.ERROR)
    log_format = '%(asctime)-6s: %(name)s - %(levelname)s - %(message)s'
    handler.setFormatter(logging.Formatter(log_format))
    logger.addHandler(handler)
    logger.info('Starting')

    # Setup GPIO buttons
    GPIO.setmode(GPIO.BCM)
    GPIO.setwarnings (False)

    GPIO.setup(BTN1, GPIO.IN, pull_up_down=GPIO.PUD_UP)
    GPIO.setup(LED, GPIO.OUT)

    # Threaded audio player
    #rt = RaspberryThread( function = repeatTTS ) # Repeat Speak text
    rt = RaspberryThread( function = stopTTS ) # Stop Speaking text

    volume(VOLUME)
    speak("OK, ready")
    led(1)

    while True:
        if GPIO.input(BTN1) == GPIO.LOW:
            # Btn 1
            getData()
            rt.stop()
            rt = RaspberryThread( function = stopTTS ) # Stop Speaking text
            led(1)
            time.sleep(0.5)
            speak("OK, ready")
        time.sleep(0.2)

except KeyboardInterrupt:
    logger.info("exiting")

GPIO.cleanup() #Reset GPIOs
sys.exit(0)
Bill of Materials
| Part | Note | Price | Link |
|---|---|---|---|
| Raspberry Pi 4 | The raspberry pi is used to compute the words into text | $149.99 | CanaKit Raspberry Pi 4 Extreme Kit |
| Mini Camera Module for Raspberry Pi | The mini camera is used to take in the words on the document as input | $9.86 | Arducam 5MP Camera for Raspberry Pi |
| USB Speaker for Notebook & PC | The USB Speaker will be used to play the read aloud document | $12.99 | HONKYOB USB Mini Speaker Computer Speaker Powered Stereo Multimedia Speaker for Notebook Laptop PC(Black) |
| Momentary Button | The button is used to turn the document reader on and off | $16.99 | Bojack Electronics Fun Kit |
| LED Light | The LED light shows whether the document reader is on or off – comes in the same kit as the button | $16.99 | Bojack Electronics Fun Kit |